Mostrando entradas con la etiqueta accesories. Mostrar todas las entradas

22.7.13

brazaletes fluor! un DIY en 10 minutos / neon bangles! a 10 minutes DIY


Nunca lo hubiera pensado, pero sí, me he unido a la fiebre de los colores flúor. Tenía un par de brazaletes de plástico que ni recuerdo de dónde había sacado y unos trozos de estas cuerdas de colores chillones. Con unas tijeras y la pistola de silicona caliente, enrosca, enrosca, enrosca...y listo! en 10 minutos me hice dos de estos brazaletes para darle chispa a unos shorts y una camiseta blanca. Hablando de shorts, si quieres aprender cómo reciclar unos vaqueros y hacerte unos, aquí tienes un tutorial muy fácil
I´d never believe it, but yes, I have joined the neon fever. I dont´remember where did i get them but I had this couple of plastic bracelets and a few pieces of neon rope. Using scissors and a hot glue gun, roll, roll, roll... and you are done! in 10 minutes I made ​​two of these bracelets to spice up my denim shorts-white tank top outfit. Oh, and speaking of shorts, if you want to learn how to recycle your jeans, here's a very easy tutorial.


1.5.13

DIY gargantilla de estrellitas / tiny stars necklace DIY


El día de la Madre está a la vuelta de la esquina, así que hoy quería compartir una idea, muy fácil de hacer y creo que un bonito detalle para ellas. Se necesitan unos 25 cm de cadena en color bronce, unos pequeños charms o colgantes con forma de pequeñas estrellas, unos aros de 3 o 5mm, un cierre y alicates para bisutería.
Mother´s Day is just around the corner, so today I wanted to share this idea, very easy to make and I think it makes a nice gift for them. You need around 25cm brass chain, some tiny star charms, some 3-5 mm loops, a lobster clasp and a couple jewelry pliers. 


¿Fácil, no? Te quiero, mamá!
Easy, right? I love you, mom!


17.4.13

da nueva vida a tu cartera / wallet restyle DIY


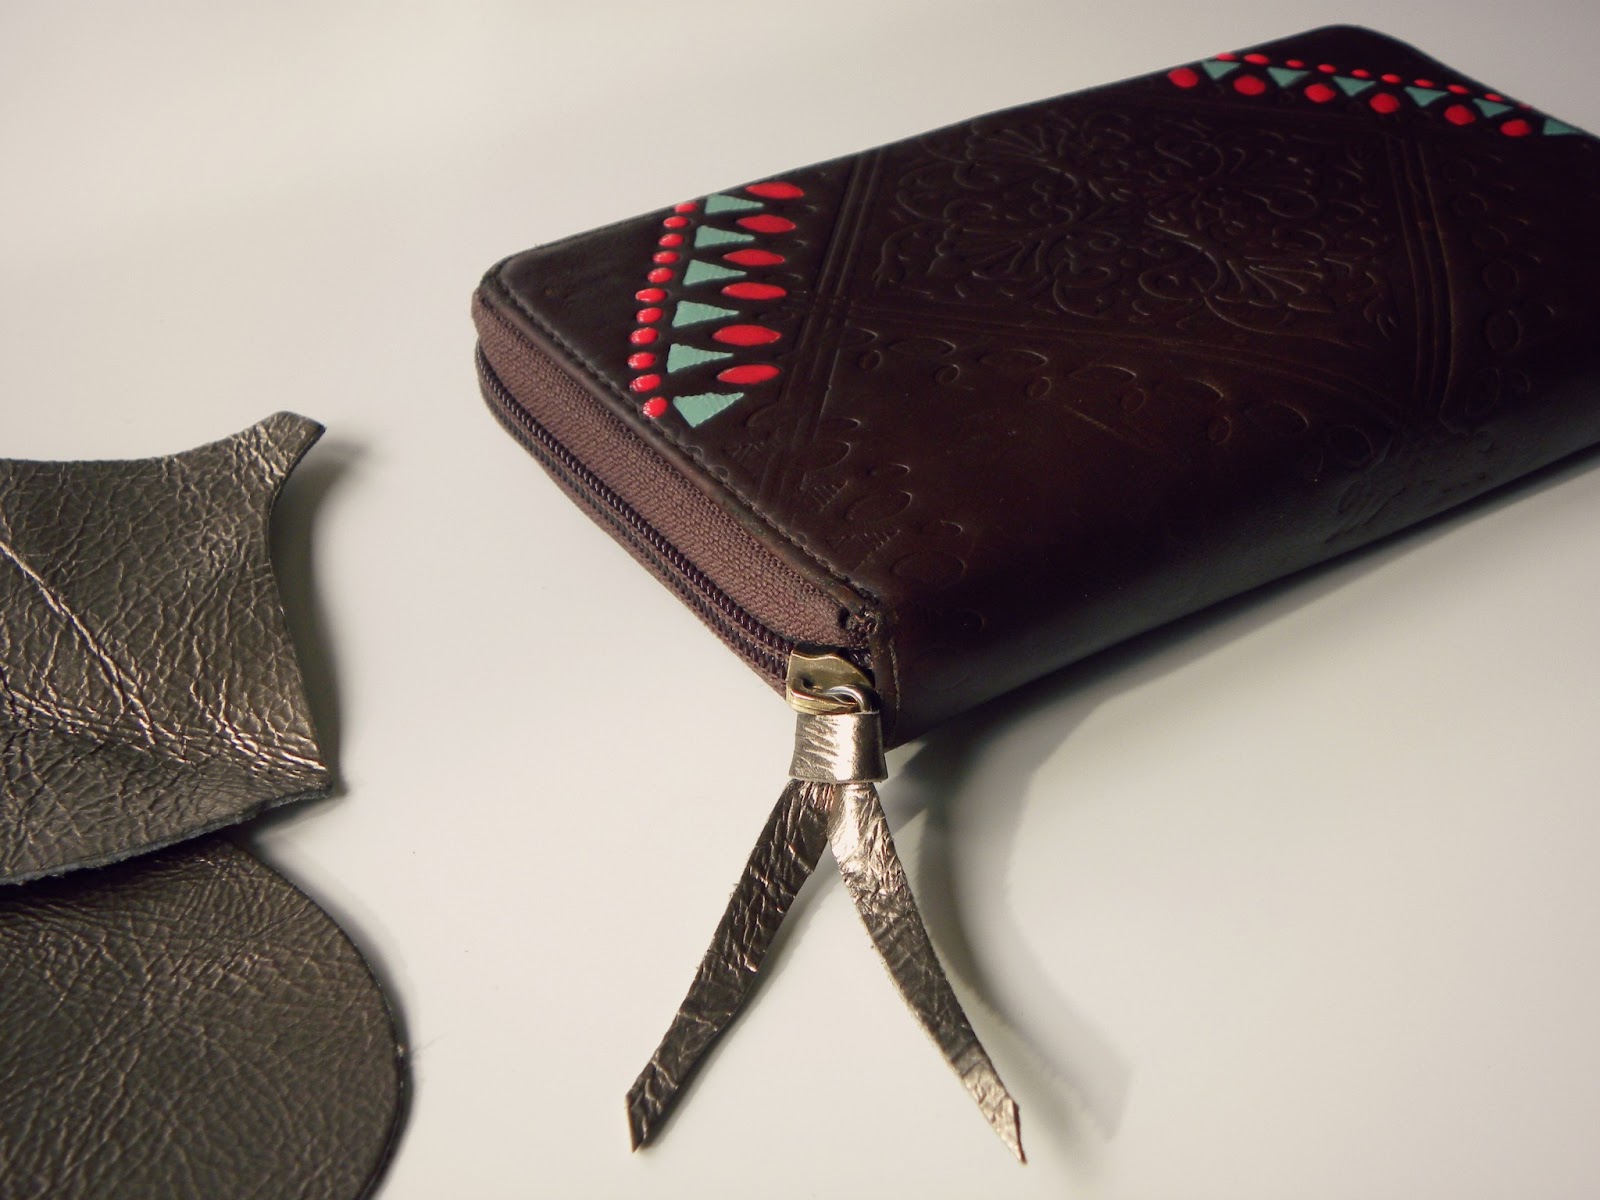
Hoy quería compartir un DIY súper sencillo y rápido. Mi vieja cartera estaba algo desastrosa, casi no podía ni abrirla porque había perdido una pieza de cuero de la cremallera y estaba bastante pelada (por fuera también, jaja!). Después de haber buscado una nueva y no encontrar ninguna lo suficientemente práctica para mí, me he decidido a darle otra oportunidad a mi vieja cartera.
Today I´m sharing a really easy and quick DIY. My old wallet was a disaster, I could hardly open it because I lost the leather piece attached to the zipper and it was also a bit broken (yeah, also outside...ahah). After searching for a new one with no success, I´ve decided to give my old wallet another chance.


Se necesita: 1. cartera vieja, 2. rotulador del mismo color, 3. tijeras, 4. un trozo de cuero (yo he utilizado uno dorado), 5. laca de uñas en los colores que más te gusten (yo he elegido menta y coral).
You will need: 1. an old wallet, 2. a marker in the same colour than your wallet, 3. scissors, 4. a leather scrap (I´ve used gold colour), 5. nail polish in the colours of your choice.


Primero, camufla las zonas desgastadas con el rotulador.
First, cover up the peeled areas with your marker.
Pinta divertidos estampados con la laca de uñas. En mi caso ha sido fácil porque la cartera ya lleva un dibujo repujado.
Paint some cheerful patterns with the nail polish. It was easy here since this wallet already had some carved patterns.
Añade una tira de cuero a la cremallera, y listo! Ya tengo cartera nueva hasta que encuentre una que me guste de verdad.
Add a little leather strip, and you are done! I have a new wallet until I find one I truly like.

12.2.13

DIY: cómo hacer una bufanda estampada de lunares con una chincheta / pOlka dot stamped scarf with a pushpin DIY

Me ha vuelto a pasar, sí. Iba a tirar esta bufanda que tenía hace mil años porque no la usaba y el color marrón me parecía demasiado soso. Así que decidí hacer lo mismo que hice con este bolso, un poco de pintura y unos meses más de vida antes de donarlo. Sólo me ha hecho falta eso, un poco de pintura dorada para tela y algo de ingenio para hacer unos lunares medianamente parecidos. ¡Y el resultado me encanta!
Yes, it happened again. I was about to donate this scarf I have had for ages because I didn´t use it anymore and the plain brown colour was boring. So, I decided to do the same I did to this bag, some paint and a few more months to good use before donating it. I just needed some gold fabric paint and a pinch of ingenuity to print uniform polka dots...and I love the result!


Ha sido súper sencillo. Quería hacer los lunares de forma rápida así que necesitaba algo que sirviera de sello redondo. Una chincheta. Clavando una chincheta en una base que pudiera sujetar de forma cómoda, como una goma de borrar, me he hecho un artilugio muy útil. Sólo hay que mojar en pintura la chincheta y empezar a pintar lunares. He usado un pincel para rellenar algunos lunares, pero el acabado más imperfecto queda muy bien.
It has been super-easy. I wanted to make the polka dots in an easy way, so I needed a tiny round shaped object to be used as a stamp. A pushpin! I pinned a pushpin in an eraser to hold it easily and I created this useful thingy. You only need to use it as a stamp to paint polka dots on your scarf. I´ve used a small paint brush to fill some of the polka dots, but I also liked the imperfect touch, though.


¡Y ya está! No puede ser más fácil...
And you are done! it coudln´t be easier...
Cristina

1.11.12

baby bandana DIY: a phototutorial


Hace un par de años estaba tomando clases de costura y me hablaron de este libro, Simple sewing for baby, de Lotta Jansdotter. En vista de la cantidad de niños a punto de venir al mundo a mi alrededor, no pude evitar comprarlo para empezar a pensar en regalitos. Está lleno de ideas sencillas, accesorios, ropita, juguetes, con instrucciones e incluso patrones. El fin de semana pasado tuve un ratito para coser así que he pensado en compartir un pequeño tutorial para hacer estas pequeñas bandanas. Me encantan, creo que voy a ampliar el patrón y a hacer alguna para mí :)
A couple of years ago I was taking sewing classes and someone told me about this book, Simple Sewing for baby, by Lotta Jansdotter. Given the number of children about to come into the world around me in that moment, I could not help buying and start thinking about baby gifts. It's full of simple ideas, accessories, tiny clothes, toys, and even patterns with instructions. Last weekend I had a little time to sew so I thought on sharing a little tutorial to show you how to make these little bandanas. I love them! I think I will enlarge the pattern and make some for me :)


Feliz jueves y gracias por pasarte!
Happy thursday and thanks for reading!
Cristina

30.5.12

geometric print hobo bag DIY

El otro día, sacando la ropa y los zapatos de verano, apareció un bolso del año de Maricastaña que ni me acordaba que tenía. Mientras lo miraba, pensando si lo tiraba o qué hacía con él, se me ocurrió una idea. Con la cantidad de ropa y complementos con estampados geométricos que he visto este año en todas partes estaba claro, iba a ser carne de DIY.
The other day, I was pulling out my summer wardrobe when I found an old hobo bag I have had for ages. While looking at it and deciding whether throwing it away or not, I came up with an idea. After seeing so many geometric prints on clothes and accesories this season, it was clear to me...this was meant to be my next DIY.

MATERIALES / SUPPLIES
un bolso viejo de polipiel / an old fake leather bag, tote or whatever you wanna revamp
pintura acrílica / acrylic paint
imprimación (opcional) / primer (optional)
pincel / brush
washi tape o cinta de pintor / washi tape or masking tape

Tan fácil como decidir el diseño que quieres en tu bolso y definirlo con washi tape. Yo he usado washi tape porque la cinta de pintor es muy ancha y quería líneas más estrechas, de unos 5-6mm. Una vez tienes el diseño, sólo tienes que pintar los huecos con pintura acrílica o similar, un pincelito y algo de paciencia. Ah, y tu música favorita para acompañar ;) Si no sabes seguro si la pintura agarrará bien al material del bolso, puedes dar una capa de imprimación antes de aplicar la pintura. Además, así los colores serán más intensos que si pintas directamente con acrílico. Cuando esté bien seco, retira las cintas con cuidado ¡y ya está! A mi me ha costado acabarlo como tres horas, pero la mayor parte del tiempo la he dedicado a decidir el diseño y esperar a que se secara la pintura. Fácil, ¿no? Un consejo: siempre asegúrate de que la cinta está bien pegada a la superficie o la pintura se colará por debajo y las líneas no quedarán limpias.

It´s as easy as designing the print of your like and defining it with masking tape. I´ve used washi tape because the masking tape I have is too wide and I wanted narrow lines, about 5-6mm. Once you have your design, you only need to paint it with acrylic paint or similar, a brush and a little bit of patience. Ah, and your fave playlist ;) If you are not sure if the paint will work on the surface your want to paint, you can paint a coat of primer before. That way, the colours will be also more intense and vibrant. When dry, carefully remove the masking tape, and you are done! I spent around three hours to get it done, but most part of the time I was designing my print and waiting for the paint to dry. Easy, isn´t it? TIP: always make sure the masking tape is perfectly stuck to the surface or the paint will slip and the lines won´t be clean.


Una tarde entretenida y bolso nuevo para este verano...no está mal ¿eh?
Gracias por pasarte!
A busy evening and a new summer bag...yikes! not that bad.
Thanks for reading!
Cristina
«

23.5.12

how to make a leather bow bracelet


No sé si os habrá pasado alguna vez, pero a mí me ocurre a menudo. De repente, me da un siroco y necesito meterme al taller y hacer cosas con las manos...me da igual coser, que pintar, que cualquier otra cosa. El caso es HACER. A veces estoy tan enfrascada pensando en los miles de cosas que me gustaría hacer, que se me pasa el tiempo volando, y para cuando me doy cuenta ya no me da tiempo a hacer ninguna...En fin, ayer no tenía realmente mucho tiempo, pero tuve uno de esos momentos, y me decidí a poner manos a la obra antes de que se me adelantara el cerebro ;) Y esto es lo que pasó, un brazalete de cuero en menos de media hora. ¿Un poco tierno, por el lacito? No, el cuero negro contrarresta tanto romanticismo...jaja. Aquí os dejo un tutorial, paso a paso.
Maybe this has happened to you before, for me is more than usual. Suddenly, I go kind of mad and I need to go to the studio and make things with my hands...I don´t mind if it´s sewing, painting or whatever. I just need MAKING things. Sometimes I bury myself in my own thoughts, in thousands of ideas and things I would like to make, to the point the time flies and when I realize...then is too late and I don´t have time enough to make any of them! Yesterday, I didn´t really have much time, but I had one of these moments, so I decided getting my hands to work before my brain ;) And this is what happened, a leather bow bracelet in less than half an hour. Maybe a little too girly with the bow? No way, black leather makes the perfect match...ahah. Here is the tutorial, step by step.
De la misma forma, pero haciendo las piezas más grandes, me hice también un cinturón marrón para llevar con vestidos o con camisetas amplias. ¿Qué os parece? Es súper fácil de hacer, y si no tenéis cuero auténtico también quedaría bien con piel sintética u otro material similar. ¡Probad y me contáis!
Following this same steps, but making the leather pieces bigger, I also made myself a brown belt to wear with dresses or oversized tops. What do you think? This is a super easy DIY, and if you don´t have real leather, synthetic leather or other similar material would be fine. Give it a try and share!
Feliz miércoles y gracias por pasarte!
Happy wednesday and thanks for reading!
Cristina
«