Mostrando entradas con la etiqueta painting. Mostrar todas las entradas
17.4.13
da nueva vida a tu cartera / wallet restyle DIY
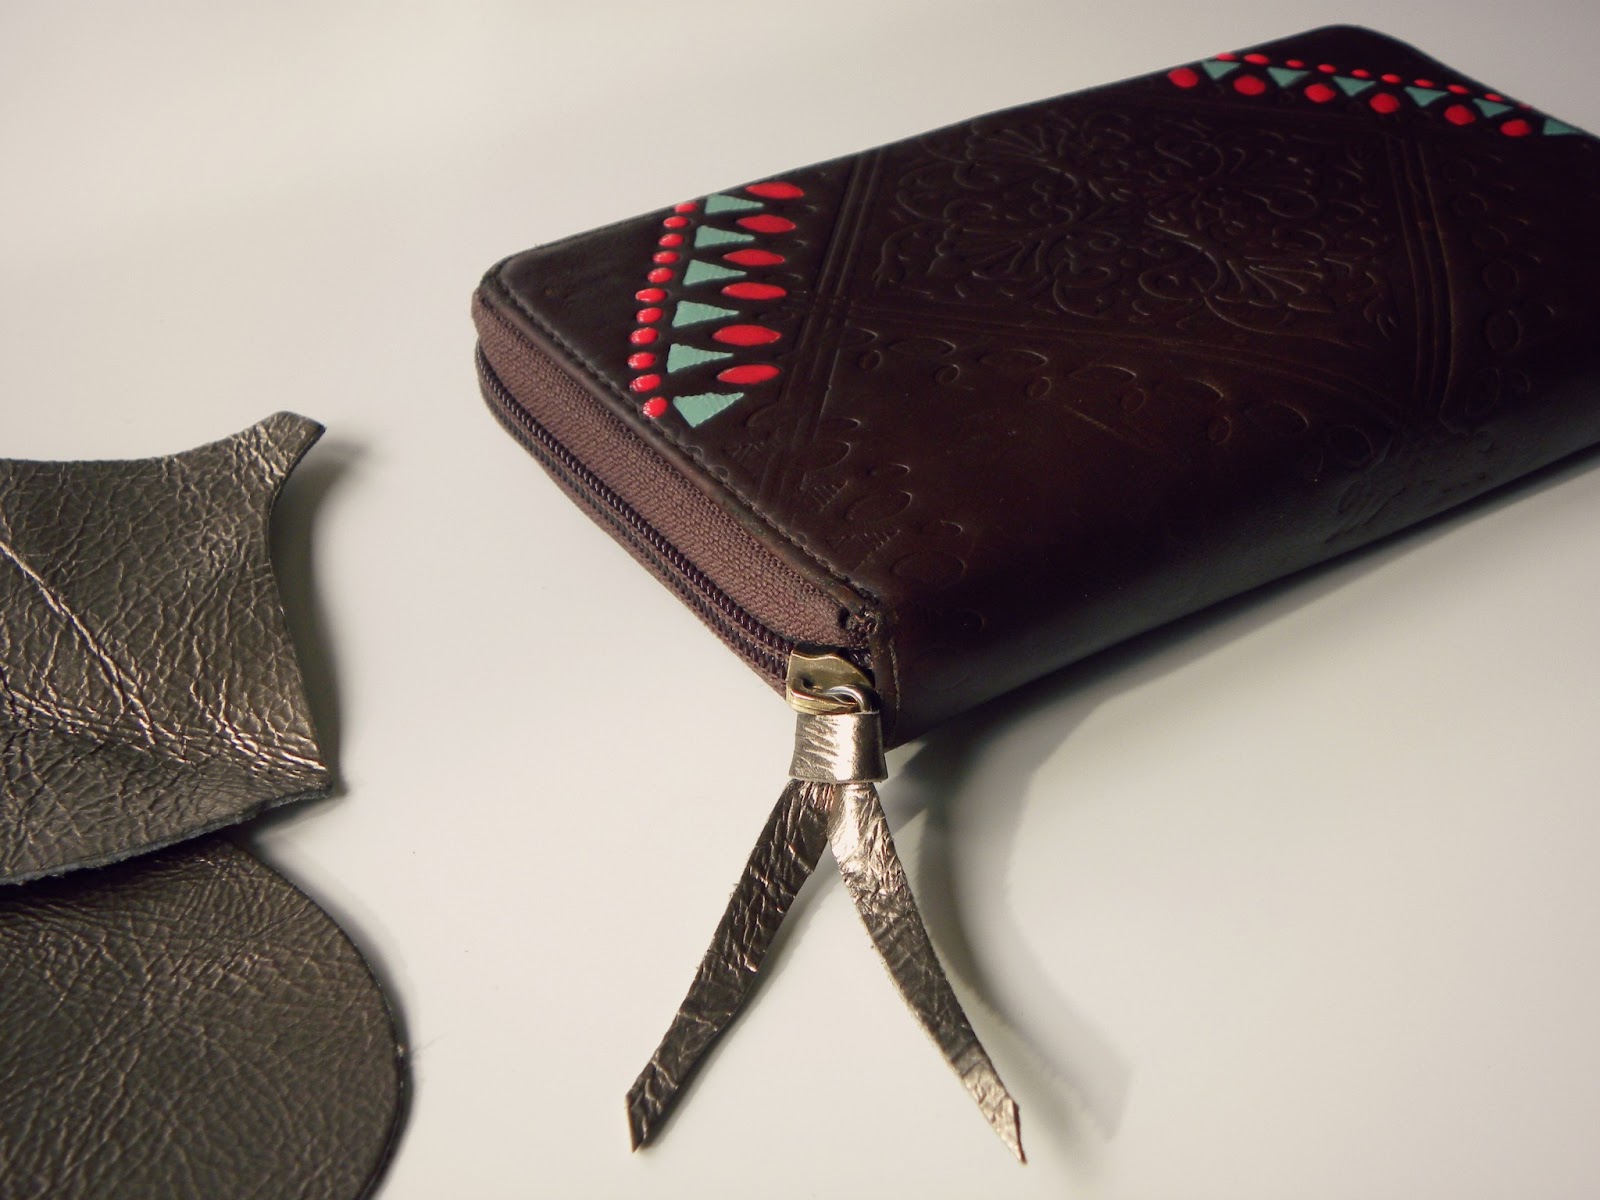
Hoy quería compartir un DIY súper sencillo y rápido. Mi vieja cartera estaba algo desastrosa, casi no podía ni abrirla porque había perdido una pieza de cuero de la cremallera y estaba bastante pelada (por fuera también, jaja!). Después de haber buscado una nueva y no encontrar ninguna lo suficientemente práctica para mí, me he decidido a darle otra oportunidad a mi vieja cartera.
Today I´m sharing a really easy and quick DIY. My old wallet was a disaster, I could hardly open it because I lost the leather piece attached to the zipper and it was also a bit broken (yeah, also outside...ahah). After searching for a new one with no success, I´ve decided to give my old wallet another chance.
Se necesita: 1. cartera vieja, 2. rotulador del mismo color, 3. tijeras, 4. un trozo de cuero (yo he utilizado uno dorado), 5. laca de uñas en los colores que más te gusten (yo he elegido menta y coral).
You will need: 1. an old wallet, 2. a marker in the same colour than your wallet, 3. scissors, 4. a leather scrap (I´ve used gold colour), 5. nail polish in the colours of your choice.
Primero, camufla las zonas desgastadas con el rotulador.
First, cover up the peeled areas with your marker.
Pinta divertidos estampados con la laca de uñas. En mi caso ha sido fácil porque la cartera ya lleva un dibujo repujado.
Paint some cheerful patterns with the nail polish. It was easy here since this wallet already had some carved patterns.
Añade una tira de cuero a la cremallera, y listo! Ya tengo cartera nueva hasta que encuentre una que me guste de verdad.
Add a little leather strip, and you are done! I have a new wallet until I find one I truly like.
14.3.13
DIY: posavasos geométricos / geometric print cork coasters DIY
Pensaba estrenar estos posavasos en una ocasión especial, en una cena con amigos... pero hey, una no coge la gripe todos los días. Así que les he dado otro estreno, repartidos por toda la casa para las mil sopas, zumos y demás que me he estado tomando esta semana. Un poco tarde, pero aquí va el foto-tutorial. Como siempre, facilísimo. Por cierto, el verano pasado customicé un bolso con la misma técnica y materiales. Puedes verlo aquí.
I wanted to use these coasters for the first time in a special occasion, a dinner with friends ... but hey, you don´t catch a flu every day. So I've been using them these days, spread them all around the house for the thousand soups and juices I've been having this week. A bit late, but here's the photo-tutorial. Very easy, as usual. By the way, last summer I customized a boho bag using the same technique and materials. You can check it here!
Sólo necesitas: 1. pintura acrílica, 2. washi tape, 3. pincel o espojilla, 4. círculos de corcho
You will only need: 1. acrylic paint, 2. washi tape, 3. brush or sponge brush, 4. cork circles
Ya has visto, súper rápidos y fáciles de hacer y un original regalo para inaugurar la casa de unos amigos o para el día del padre.
See? they are super quick and easy and they made an original gift for a housewarming party or even for Father´s Day.
Cristina
«
I wanted to use these coasters for the first time in a special occasion, a dinner with friends ... but hey, you don´t catch a flu every day. So I've been using them these days, spread them all around the house for the thousand soups and juices I've been having this week. A bit late, but here's the photo-tutorial. Very easy, as usual. By the way, last summer I customized a boho bag using the same technique and materials. You can check it here!
Sólo necesitas: 1. pintura acrílica, 2. washi tape, 3. pincel o espojilla, 4. círculos de corcho
You will only need: 1. acrylic paint, 2. washi tape, 3. brush or sponge brush, 4. cork circles
Ya has visto, súper rápidos y fáciles de hacer y un original regalo para inaugurar la casa de unos amigos o para el día del padre.
See? they are super quick and easy and they made an original gift for a housewarming party or even for Father´s Day.
Cristina
«
30.5.12
geometric print hobo bag DIY
El otro día, sacando la ropa y los zapatos de verano, apareció un bolso del año de Maricastaña que ni me acordaba que tenía. Mientras lo miraba, pensando si lo tiraba o qué hacía con él, se me ocurrió una idea. Con la cantidad de ropa y complementos con estampados geométricos que he visto este año en todas partes estaba claro, iba a ser carne de DIY.
The other day, I was pulling out my summer wardrobe when I found an old hobo bag I have had for ages. While looking at it and deciding whether throwing it away or not, I came up with an idea. After seeing so many geometric prints on clothes and accesories this season, it was clear to me...this was meant to be my next DIY.
MATERIALES / SUPPLIES
un bolso viejo de polipiel / an old fake leather bag, tote or whatever you wanna revamp
pintura acrílica / acrylic paint
imprimación (opcional) / primer (optional)
pincel / brush
washi tape o cinta de pintor / washi tape or masking tape
Tan fácil como decidir el diseño que quieres en tu bolso y definirlo con washi tape. Yo he usado washi tape porque la cinta de pintor es muy ancha y quería líneas más estrechas, de unos 5-6mm. Una vez tienes el diseño, sólo tienes que pintar los huecos con pintura acrílica o similar, un pincelito y algo de paciencia. Ah, y tu música favorita para acompañar ;) Si no sabes seguro si la pintura agarrará bien al material del bolso, puedes dar una capa de imprimación antes de aplicar la pintura. Además, así los colores serán más intensos que si pintas directamente con acrílico. Cuando esté bien seco, retira las cintas con cuidado ¡y ya está! A mi me ha costado acabarlo como tres horas, pero la mayor parte del tiempo la he dedicado a decidir el diseño y esperar a que se secara la pintura. Fácil, ¿no? Un consejo: siempre asegúrate de que la cinta está bien pegada a la superficie o la pintura se colará por debajo y las líneas no quedarán limpias.
It´s as easy as designing the print of your like and defining it with masking tape. I´ve used washi tape because the masking tape I have is too wide and I wanted narrow lines, about 5-6mm. Once you have your design, you only need to paint it with acrylic paint or similar, a brush and a little bit of patience. Ah, and your fave playlist ;) If you are not sure if the paint will work on the surface your want to paint, you can paint a coat of primer before. That way, the colours will be also more intense and vibrant. When dry, carefully remove the masking tape, and you are done! I spent around three hours to get it done, but most part of the time I was designing my print and waiting for the paint to dry. Easy, isn´t it? TIP: always make sure the masking tape is perfectly stuck to the surface or the paint will slip and the lines won´t be clean.
Una tarde entretenida y bolso nuevo para este verano...no está mal ¿eh?
Gracias por pasarte!
A busy evening and a new summer bag...yikes! not that bad.
Thanks for reading!
Cristina
«
24.4.12
easy work lamp revamp DIY
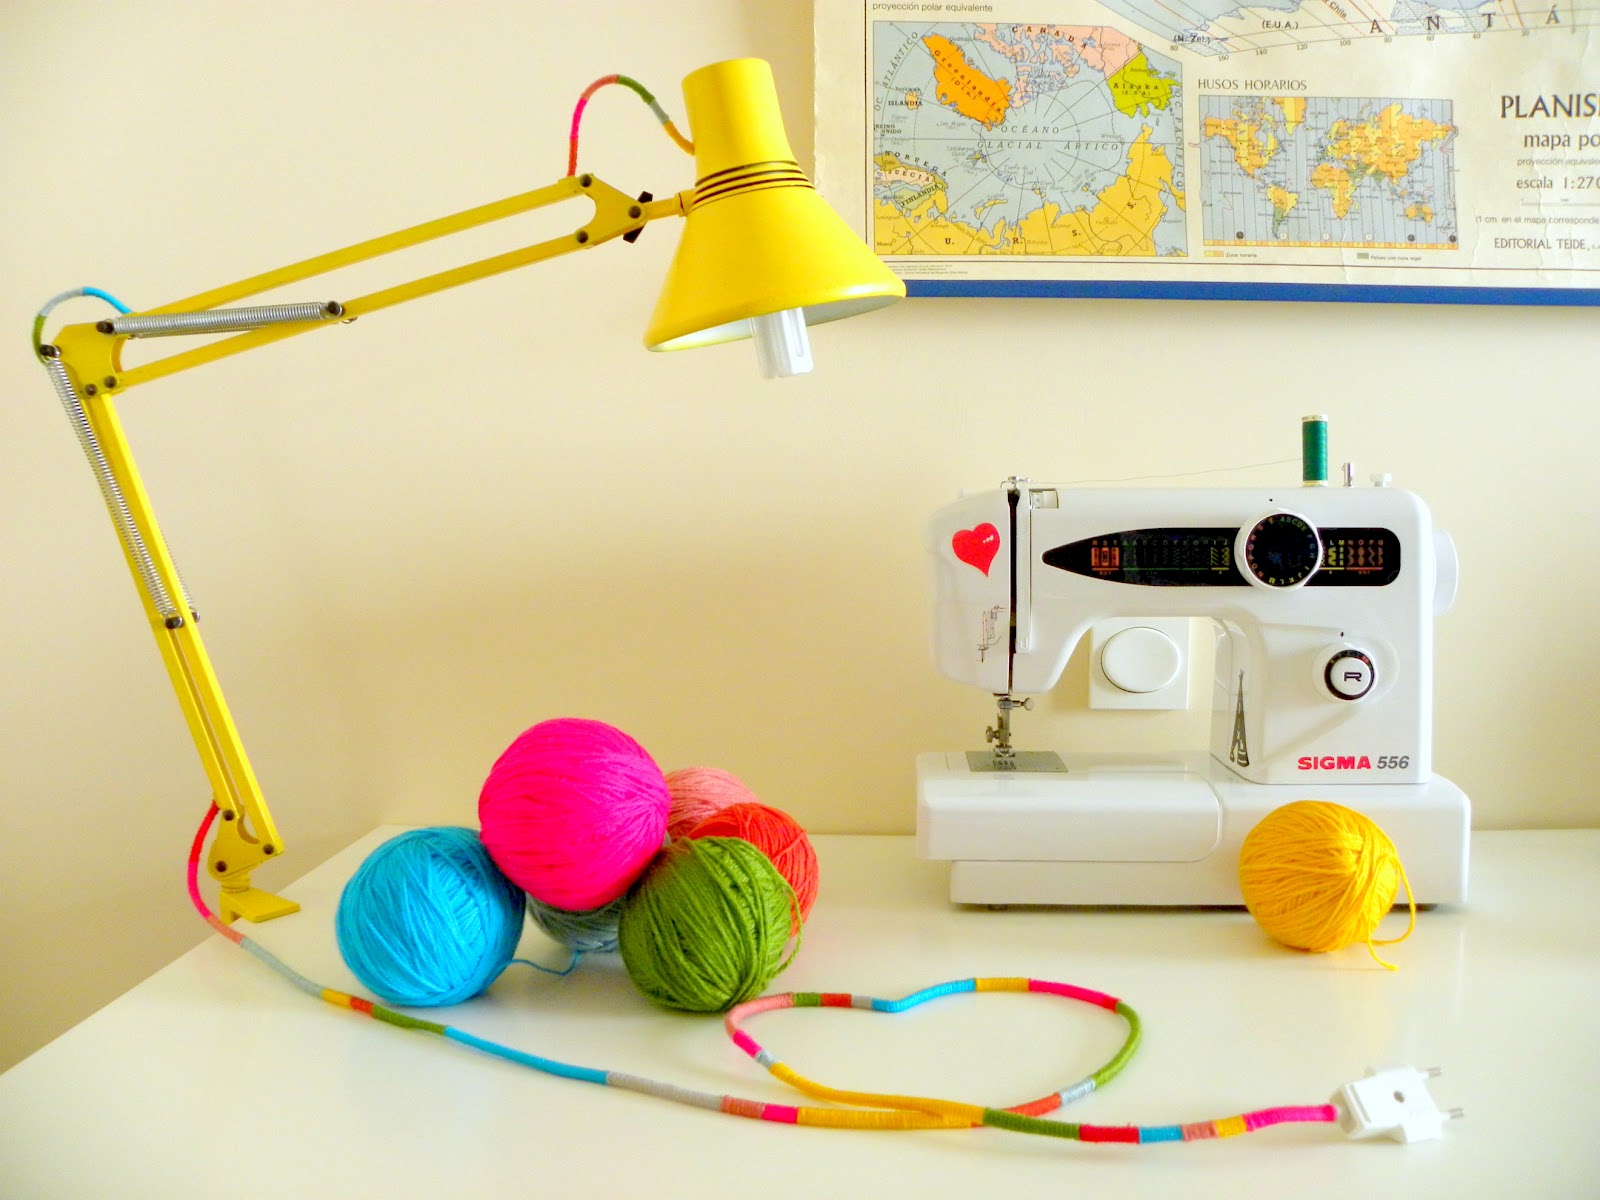
¿Os acordáis que aún tenía otra cosa pendiente de enseñaros desde este post? Después de la mudanza me había quedado sin lámpara para mis tardes de costurillas, así que pensé en comprar un flexo nuevo. La idea inicial era buscar uno de estilo retro, de los de toda la vida, hasta que me acordé de que ya tenía uno que me podía servir, sólo que era súper sosa. Así que manos a la obra...un poco de trapo, desmonta, pinta (con spray, por supuesto! ;) ), cable nuevo y un poco de lana que tenía por ahí...et voilà! COSTE TOTAL: 5 Euros
AVISO: cuando desmontes cualquier objeto, fíjate bien en cómo es para no volverte loco cuando lo tengas que volver a montar...jaja
Do you remember I still had something to show you since this post? After moving, I had no work lamp for my sewing evenings, so I thought about buying a new one. The initial idea was to find a retro style work lamp, but then I remembered I already had one that could serve, but it was super boring. So get to work... a bit of cleaning, disassemble, paint (spray paint, of course;)), new wire and some yarn I already had somewhere...et voilà! TOTAL COST: 5 Euros
WARNING: whenever you disassemble any device, make sure you know how to assemble it back so you don´t go nuts later...haha
¿Has reciclado algún trasto últimamente? Compártelo! Deja tu comentario y enlace para que podamos verlo :) Feliz martes y gracias por pasarte!
Have you recycled any item lately? Share it! Leave your comment and a link so we can see it :) Happy Tuesday and thanks for reading!
Cristina
«
10.4.12
vintage fruit stand to jewelry display
Hola! he estado unos días desconectada por problemas técnicos (básicamente mi ordenador es casi vintage...jaja), por eso no he podido actualizar el blog antes. Así que he aprovechado estos días para ir al pueblo, ver a la familia, descansar y como no podía ser de otra forma, comer demasiado. Pero no todo ha sido holgazanear, hemos hecho algo de limpieza en la casa de mi abuela, y le hemos dado un par de manos de pintura a la bodega. Sí, en La Rioja es común tener bodega en los pueblos, de esas que son como pequeñas cuevas excavadas en misma tierra o en rocas. En la de mi familia, mi padre hace un vino DE-LI-CIO-SO.
También ha habido algo de DIY (do it yourself = hazlo tú mismo), aunque hoy solo os enseño uno de ellos. Esta vez le ha tocado el turno a un viejo frutero medio oxidado que me quedé de recuerdo cuando murió mi abuela. Me lo quedé con la idea de darle una limpieza y utilizarlo para organizar cositas pequeñas en mi taller, pero de momento, se queda en mi mesilla de noche.
Hi, there! I have been offline for a few days due to technical problems (basically my computer is almost vintage ... haha), so I could not update the blog before. I've spent these days visiting my family in our little village, relaxing and of course, eating way too much. But not everything has been loitering. We did some spring cleaning at my grandmá´s house, and given the wine cellar a couple of coats of paint. Yes, in La Rioja is common to have a wine cellar, the kind that are like tiny caves dug in the ground or in the rocks. In my family´s one, my father makes a DE-LI-CIOUS wine.
There have been some DIY (do it yourself) as well, but today I´m showing you only one of them. This time it was the turn to an old and rusty fruit stand I kept when my grandmother died. The idea was giving it a good clean and use it to organize little things in my workshop, but for now, it´ll stay on my nightstand.
Los pasos a seguir son los mismos que para el cuerno de ciervo que os mostré aquí hace poco, y sólo se necesita un poco de paciencia y pintura en spray ¡preparáos porque creo que he descubierto mi nueva obsesión! ;)
I followed almost the same steps for the antler I recently showed you here, and it only takes a little patience and spray paint. Get ready, I think I´ve found my new obsession!
¿Qué os ha parecido? Decorar una casa desde cero puede resultar muy caro, pero con un poco de imaginación es fácil dar nueva vida a objetos que ya no nos gustan o que, como este, terminarían seguramente en la basura. Teníais que haber visto la cara de mi madre, ANTES ("¿pero para qué quieres ese trasto??Si te viera tu abuela...") y el DESPUÉS ("Qué bonito!!Ojalá lo viera tu abuela").
Aún tengo un par de inventos que enseñaros, pero aún están en proceso...
What do you think? Decorating a house from scratch can be very expensive, but with a little imagination it is easy to bring to life objects you don´t like anymore, like this one, which probably would have ended up in the trash. You should have seen my mom´s face, BEFORE ("but why do you want that piece of junk?? If your grandma could see you...") and AFTER ("That´s cute! I wish your grandma could see you")
I still have a couple of inventions to show you, but they are still in process...
Feliz martes y gracias por pasarte!
Happy tuesday and thanks for reading!
Cristina
«30.3.12
antler sculpture DIY
En los últimos meses he visto en muchos blogs de diseño y decoración esta tendencia de los cuernos de ciervo. Pintados o no, se lleva usarlos de muchas formas, para hacer lámparas, candelabros, como decoración de pared o incluso como colgadores de pared, como en la foto que veis abajo.
In the last months, I´ve seen this deer antler trend in many design and decoration websites. Painted or not, using them for lamps, candle holders, wall decoration or even as a coat rack (as seen below) is trendy.
A mi me gustaba la idea de utilizarlo como objeto decorativo, a modo de escultura que puedes colocar encima de unos libros o para colgar bisutería encima de una cómoda. Lo que he hecho es muy sencillo. Sólo necesitas:
- un cuerno de ciervo ***PD: NINGÚN CIERVO HA SUFRIDO DAÑO ALGUNO EN LA REALIZACIÓN DE ESTE POST. LOS CIERVOS PIERDEN SUS CUERNOS Y LOS REGENERAN CADA AÑO, ASÍ QUE SI MADRUGAS Y TIENES SUERTE, PUEDES ENCONTRARLOS POR EL SUELO EN LOS BOSQUES DONDE VIVEN ;) ***
- agua, jabón y un cepillo
- imprimación (en cualquier tienda de bricolaje)
- brocha fina
- pintura en spray de tu color favorito (yo escogí Blanco Divinidad)
I liked the idea of using it as a decorative item, like an sculpture you can put on the top of some books or a jewelry display on a cabinet. What I´ve done is so simple. You only need:
- a deer antler ***PS: NO DEERS WERE HARMED IN THE MAKING OF THIS POST. DEERS SHED THEIR ANTLERS ANNUALLY AS A PRELLUDE OF NEW ONES. IF YOU ARE AN EARLY BIRD AND LUCKY ENOUGH, YOU MIGHT FIND ANTLERS ON THE GROUND IN THE FORESTS DEERS LIVE ;) ***
- water, soap and a nailbrush
- primer (from the hardware store)
- a small brush
- spray paint in your favorite color (I chose Divinity White)

Y así se hace:
- Es aconsejable limpiar el asta con un cepillo, agua y jabón, para eliminar la suciedad que pueda haber en la superficie. Dejar secar.
- Una vez seca, dar una capa de imprimación con una brocha. Seca bastante rápido, pero mejor asegurarse. Yo lo dejé secando toda la noche.
- Pintar con la pintura en spray, siempre en un lugar bien ventilado. IMPORTANTE: la mejor forma de pintar con este tipo de pintura es hacerlo en varias capas muy finas, dejando secar bien entre capa y capa.
And here´s how to:
- It´s better if you clean the antler with a brush, water and soap, to remove the dirt from the surface. Let it dry.
- Once it´s dry, paint a coat of primer. It dries quickly, but make sure it is completely dry. I let it overnight.
- Paint with spray paint, always in a well ventilated room. IMPORTANT: the best way to spray paint is painting fast multiple thin coats, letting it dry in between coats.
He aprovechado también para rescatar unos marcos de fotos y portavelas de estilo étnico que tenía hace mil años y ya no me gustaban. Con un bote de pintura y unos trastos viejos he decorado un rincón del dormitorio con muy poco presupuesto.Y este es el resultado final, espero que os guste!
I´ve also rescued some ethnic photo frames and candleholders I had a thousand years ago and I didn´t like anymore. With a can of paint and some old junk I´ve decorated a nook in the bedroom on a budget. And this is the result, I hope you like it!
Happy weekend and thanks for reading!
Cristina
«
Suscribirse a:
Entradas (Atom)